Detachable Hair Dryer Brush Styler: 6-in-1 Guide
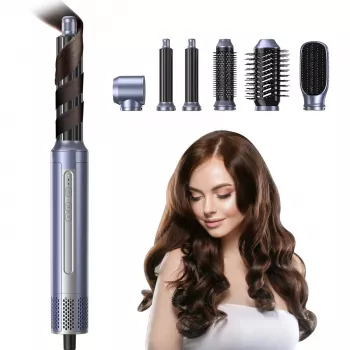
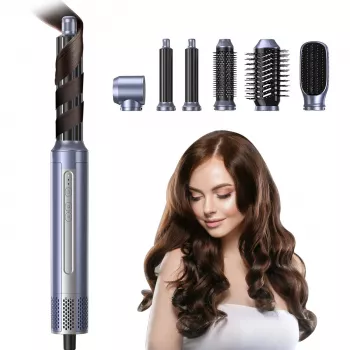
6-in-1 Detachable Hair Dryer Brush & Styler: One Handle, Multiple Finishes
Busy mornings rarely leave room for juggling a dryer, round brush, and a separate styler. A detachable hair dryer brush styler keeps your routine simple: one powered handle, interchangeable attachments, and quick switches between smoothing, volumizing, and polishing the ends. Our team put together a practical, step-by-step approach so you can get a finish that lasts—without overworking your hair. For more guidance, see Air Brush Conair Hair Multi Stylers Irons … – NAHR-IQ.ORG.
What a detachable hair dryer brush styler changes in a routine
- Fewer tools on the counter: one base handle plus attachments instead of a separate dryer and multiple brushes.
- Faster transitions: detach one head and click in the next to move from rough-dry to smooth or add lift.
- More consistent technique: airflow and brushing happen together, helping you keep direction and tension more uniform from section to section.
- Easier travel and storage: detachable heads typically pack flatter than a full-size brush dryer.
- Great for refresh days: re-shape bangs, flip ends, or revive crown volume without committing to a full wash.
Meet the 6-in-1 Detachable Hair Dryer Brush & Styler
Our 6-in-1 Detachable Hair Dryer Brush & Styler is built for flexible styling: you switch attachments as your hair dries and shapes, instead of starting over with a separate tool. The biggest difference-maker is sequencing—pre-dry first, then refine with smoothing and volumizing steps, then finish the ends. With simple prep (towel-dry, detangle, heat protectant, and manageable sections), you get a more polished blowout look at home with less back-and-forth. For further reading, see Rotating Hair Dryer Brush Ceramic, Blow ….
A practical 6-in-1 styling flow (from damp to finished)
| Stage | Goal | How to do it | Common mistake to avoid |
|---|---|---|---|
| Prep | Protect + detangle | Blot to remove excess water, comb through, apply heat protectant evenly | Starting on soaking-wet hair (takes longer and increases heat exposure) |
| Pre-dry | Get to mostly dry | Use airflow to reduce moisture; keep the tool moving and lift roots | Trying to create volume before hair is partly dry |
| Smooth | Reduce frizz, align strands | Work in medium sections with steady tension; direct hair downward | Going too fast (the section won’t fully shape) |
| Volumize | Add lift at the crown and front | Lift at roots, hold briefly, then release and let cool | Overloading with product that weighs roots down |
| Finish | Polish ends + set shape | Shape ends with a short, controlled pass; let the section cool | Repeated passes on the same spot |
How to use it for three everyday looks
1) Smooth, straight finish
Pre-dry until your hair is mostly dry, then work top-to-bottom in sections with gentle, consistent tension. Keep your direction uniform (generally downward along the strand) so your cuticle lays flatter and the finish looks sleeker.
2) Soft volume blowout
Start by building lift at the roots—especially at the crown and the front—then shape mid-lengths and ends. Once you release a section, let it cool before touching it; that brief cool-down helps the shape stay put instead of falling flat immediately.
3) Flipped or tucked ends
Save end-shaping for the last moments of styling, when everything is nearly finished. Use short, controlled passes at the ends only to create a crisp flip or tuck without reheating the full strand.
Hair-type guidance for better results (and less effort)
- Fine hair: prioritize root lift and skip heavy creams at the base. Smaller sections help you get control without lingering too long on one area.
- Thick hair: pre-dry thoroughly before refining; more sections means each pass can actually smooth instead of just warming the surface.
- Curly or wavy hair: decide your goal first (stretched smooth vs. enhanced wave). For a sleeker finish, reduce moisture first, then smooth in a consistent downward direction.
- Frizz-prone hair: pair heat protectant with a light smoothing product, keep airflow moving, and avoid styling in a steamy, humid bathroom when you can.
- Damaged or color-treated hair: reduce total heat time by towel-blotting well, using lower settings when available, and doing fewer, more deliberate passes per section.
For general damage-prevention habits, the American Academy of Dermatology Association has clear, practical guidance. And for an overview of how hair products fit into U.S. cosmetics oversight, the U.S. Food & Drug Administration is a reliable reference.
Small technique tweaks that make the style last
Care, cleaning, and storage for detachable attachments
Two quick add-ons our team likes for smoother mornings
- 6-in-1 Detachable Hair Dryer Brush & Styler — a single-handle styling approach that makes switching from pre-dry to polish faster and simpler.
- Your Daily Outfit Shortcut: Time-Saving Outfit Combinations for Effortless Style — when your hair is handled, having an outfit plan keeps the rest of your routine just as efficient.
FAQ
Is a detachable hair dryer brush styler better than using a regular dryer and round brush?
It can be, because airflow and brushing happen at the same time and detachable heads make transitions quicker. Traditional tools can still deliver great results, but they usually require more coordination and switching between steps; with either option, sectioning and controlled tension are what make the finish look intentional.
How wet should hair be before using a hair dryer brush styler?
Start with towel-dried, detangled hair, then pre-dry until it’s mostly dry before you focus on smoothing or volume. This helps cut down total heat exposure and makes your shaping passes more effective and longer-lasting.
How do you reduce frizz when using a blow-dry brush?
Use heat protectant, keep your direction consistent (generally downward), and work in manageable sections so you don’t need repeated passes. Avoid piling on heavy product at the roots and let sections cool before you brush through to keep the surface smoother.














Leave a comment